Many divers and underwater photographers love to explore the ambiance created by sunlight piercing through small openings to illuminate caves or caverns under water. It is the light inside these spaces that excites the imagination. Underwater photographers seek to express their impressions through the lens, but many find it difficult to recreate the scene the way it was impressed upon their mind. The key is to use the light that is available without introducing artificial light.

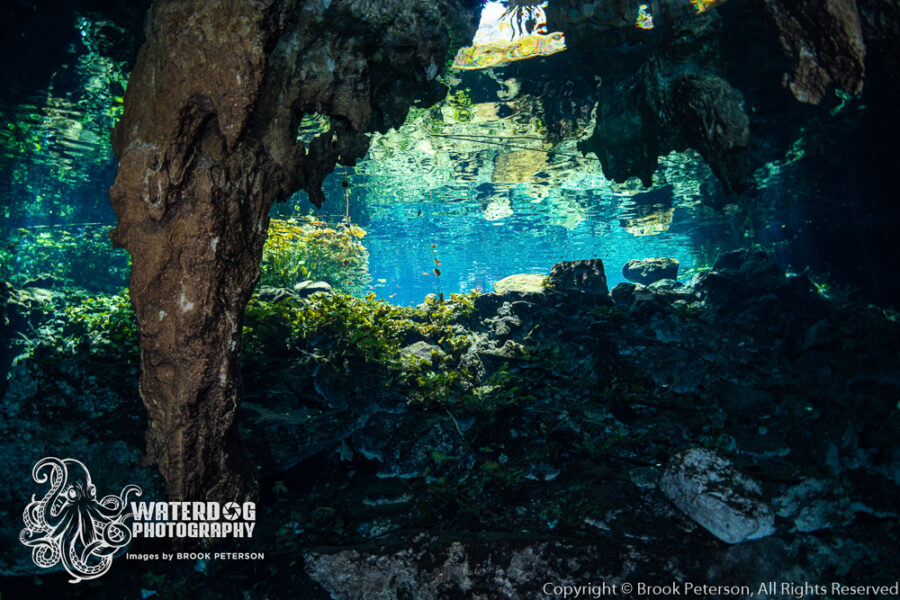
So how does one go about capturing ambiance when there is so little light to begin with? Caverns can be very dark, even if they look like they are well lit by the sunbeams coming down from above. It will be necessary to compromise the settings on your camera much more than you are accustomed to doing. If you are shooting with a mirrorless or DSLR camera, you will need to adjust the ISO, shutter speed and aperture. It will not be sufficient to simply crank up your ISO, or slow down your shutter speed. Instead, try balancing the three somewhere in the middle. The image above was shot with the ISO at 2000, f/8 and 1/40s. While this may seem to be a big compromise where focus is concerned, taking several shots of the same scene will improve your chances of getting one that is sharp.
Focus may be difficult in dark caverns, but using a focus light is not a good option because the beam may show in your images. Instead, you can lock focus before going into the dark, or use back button focus so the camera doesn’t try to auto focus while you are shooting. Also, you should be aware that your images may look much brighter on your LCD screen than they really are because your eyes will be adjusted to the dark. Since you will already be pushing the limits of your camera’s exposures, you don’t want to introduce more noise in post processing by having to brighten your images up, so don’t let your eyes trick you.

When you adjust your camera settings to let in so much ambient light, you may experience “hot spots” where the light comes through the surface. To avoid these, you can hide them behind formations in the cave, or raise yourself to a shallow enough depth that you are not shooting in to the light, but rather across it.
One of the best things about using the natural light inside a cavern is the ability to express depth in your image. Strobe light has the effect of making everything look flat, but when you are able to use light coming in from multiple places, you naturally have more depth to your image. Look for features that lead the eye such as a natural path, or formations in the cavern. You can use light coming in from an adjacent or distant cavern, and often a model can help. If you do use a model, make sure the ambient light is either behind or on the model to distinguish them from the background.

Another important thing to remember, is that when you are taking photographs of a cave or cavern, you must be inside the cave or cavern, looking out toward the light. If you are in the entrance, looking in, your images will be flat unless there is a light source in front of the camera. Always point your lens toward the cave opening, or toward the light shafts for the best result.

Sometimes the story you are trying to tell is about the beams of light, such as in the cenote, “The Pit” where the shaft of light travels more than 100 feet to the cavern floor. Sometimes the story is about a feature in the cave that you want to showcase. In some cases, it might be necessary to use a bit of strobe to light a particularly interesting formation. Be careful that the strobe light does not over power the ambiance. Remember that you are shooting with settings wide open, so it may be necessary to use only one strobe and turn it down to a very low setting.

The cavern in the image below had an opening that brought shafts of light inside for most of the day. The light landed on the same spot each day, allowing a bit of coral to grow in the light. This image was lit using only natural light, but combining the ambiance of the shafts of light with the interesting cave feature of the orange coral.

Light that comes down from heaven above is sometimes called cathedral light because it is similar to the natural light coming in through the windows of early cathedrals. The beams look best when they begin and end in the frame so that the eye travels through the image. The beams will be more focused if the surface of the water is calm and the sunlight is bright. Generally, the best light is in the middle of the day, but there are many cenotes and caverns that will have their best sunbeams at other times.

It is interesting that the best pictures of dark caverns, cenotes and caves are actually pictures of light. Light is the most important aspect of the image because it is the ambient light that creates a mood. But don’t forget that other elements such as the color of the cave or the sulfide layer at the bottom of a cenote help to create a mood as well. Whether you preserve the color of the water, or white balance the image, the result will invoke some kind of mood. Mood and ambiance is the key to telling the story, so keep this in mind as you shoot. After all, you are limited only by your imagination.

Join me for a workshop! Travel to a great destination where you will have exclusive coaching on your underwater photography. Meet new people, network, try new techniques, and learn with the pros! Click on Travel and Workshops for more information.
Subscribe now!
As always, if you enjoy my images please visit my website, waterdogphotography.com, or give me a like on Facebook at Waterdog Photography Brook Peterson. Don’t forget to follow me here at waterdogphotographyblog and please feel free to share on Facebook or other social media.
My photographs are taken with a Nikon D850 in Sea and Sea Housing using two YS-D2J Strobes.
All images and content are copyright protected by Brook Peterson and may only be used with written permission. Please do not copy or print them. To discuss terms for using these images, please contact me.
© Brook Peterson 2019

