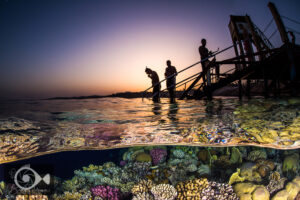
Snorkelers entering the sea via stairs at the end of a pier
Good split shots have an interesting subject above the waterline as well as an interesting subject below. The main subject can either be above or below the waterline. The challenge is to get both in focus and lit so that the illumination appears uniform throughout the image. It is necessary to have a dome port and a fisheye lens such as the Tokina 10-17mm or a 15mm fisheye lens. The proper lens will aid in creating an even depth of field. Use a high aperture such as f/16 to f/20 so that the foreground which is close to you is in focus as well as the background which will be further away. When shooting, focus on the foreground subject, stopping down the aperture until the background is also in focus. This is the biggest challenge of split shots and takes some practice to master.

It is likely that the subject below the waterline will be darker than the subject above so proper lighting of the underwater subject is important. You will need to focus the majority of your attention on the underwater subject, keeping in mind that whatever is above the waterline will need to be lit properly as well. For this, expose the image for the “above the water” portion of the image. Keep the aperture around f/16 to f/20 and adjust the shutter speed and ISO so that the lighting is appropriate. Use your strobes to light the underwater portion of the image, taking care to match the brightness of the strobes with the exposure above the water line. This can be especially challenging with sunset or sunrise shots as the water is generally very dark in comparison to the sunset.

During the daytime, when the sun is high, even lighting is a bit easier to accomplish. The image above was shot using only natural light and no strobes. The underwater portion is darker than above the waterline, but in this case the image works. For some animals or other subjects, it would be necessary to light the subject with strobes to create that even lighting effect.

Another challenge that is faced when using a fisheye lens is keeping the horizon straight. The above shot was created with an 8mm circular fisheye lens which can distort the horizon a great deal unless the horizon is placed directly in the middle of the shot. This has the effect of cutting the image in half and is not a very pleasing composition. But what makes the above image work is that a portion of coral below water is refracted in the surface of the water just under the horizon. This has the effect of dividing the image into thirds which is much more pleasing.

The image above is another example of how to compose a pleasing split shot. The image is divided in thirds with a (mostly) straight horizon. The subject underwater is refracted above the surface giving the illusion that the majority of the image is under water. A dramatic sky gives the image an interesting background along with the huts.

An over under split in the Red Sea
A few other tips that will help you achieve beautiful splits are more practical in nature. A large (8 inches or more) dome port, for example aids in getting a straighter horizon and a smaller meniscus (the area where the waterline touches the glass.) Keeping your dome port dry will keep water spots from forming and distorting the image. If this is not possible (and it rarely is) dip your dome under water just before taking the shot so that the water does not have time to form droplets. One other piece of practical advise is to place a float such as a styrofoam pool float under your housing to aid you in lifting your camera out of the water. Dedicate the time to split shots and do them on snorkel so that you can stay shallow enough to get close to your subject. If you are shooting big animals such as sharks, wait until they are at the surface. Your dome port will only be a few inches under water so the subject must be very close and very shallow. Calm water conditions will also aid in getting a straighter meniscus, but if this is not possible, try shooting a vertical shot which gives you a little more room for error.
Join me for a workshop! Travel to a great destination where you will have exclusive coaching on your underwater photography. Meet new people, network, try new techniques, and learn with the pros! Click on Travel and Workshops for more information!
Subscribe now!
As always, if you enjoy my images please visit my website, waterdogphotography.com, or give me a like on Facebook at Waterdog Photography Brook Peterson. Don’t forget to follow me here at waterdogphotographyblog and please feel free to share on Facebook or other social media.
My photographs are taken with a Nikon D810 in Sea and Sea Housing using two YS-D2 Strobes.
All images and content are copyrighted by Brook Peterson and may only be used with written permission. Please do not copy or print them. To discuss terms for using these images, please contact me.
copyright Brook Peterson 2018


