Scuba diving is an adventure and there is something about diving on a shipwreck that awakens the little kid in me. Maybe it is the mystery of the ship’s sinking, or maybe the fantasy that there will be a hidden treasure chest, or maybe it is even a sense of the wandering spirits who are forever trapped in their watery grave. Whatever I am feeling as I explore a shipwreck, I want to capture that moment in my photography. But photographing shipwrecks can be challenging, and how do you convey your experience to others? It all starts with having a good foundation of photographic tools to draw from.

One of the most apparent challenges of wreck photography is how to light the wreck. Most shipwrecks are much bigger than our strobes can cover, so we are limited to either shooting with ambient light, (which we can leave natural or turn to black and white in post processing) or we can shoot just a portion of the wreck.
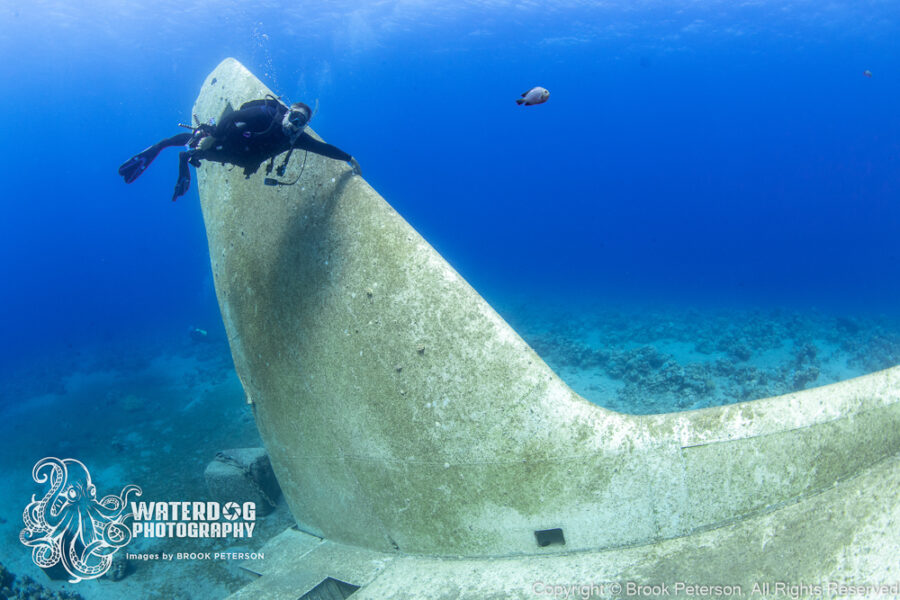
When we photograph a wreck using ambient light, we must adjust the camera settings to let in as much light as needed so that the background is a nice blue, and the wreck is properly exposed. I would suggest you test shoot several images to get the exposure right. Start by using a shutter speed around f/80-f/120 and adjust the aperture and ISO. Remember that if you want good depth of field you will need a higher aperture, so ISO is the most likely adjustment you will make. With today’s newer digital cameras, you should be able to adjust the ISO to a fairly high number without too much noise. Look on the LCD to see if there is good detail in the wreck. You will want to see a range of shadows and highlights.
It is also important to note which direction the natural light from the sun is coming from. If the sun is behind you, you can expect more detail in the subject. If the sun is behind the wreck, you can expect it to be in silhouette. In the image above, the sun is behind me. This image works well processed as a black and white photograph because of the detail and contrast in the image. Below, the bow of the Kittiwake is in silhouette (which also works well as a black and white photo) because I am shooting into the sun giving a dramatic look to the photograph. The stern is shot with the sun at my back giving more detail to the shot.
Another tool you can use to light a large wreck is a filter. Magic Filters™ are developed for underwater photographers and help compensate for the lack of reds in the water. They work best without strobes, with the sun at your back and your camera angled slightly down. You will need to set your camera to manual white balance, so that the image is processed in camera with the correct colors. The advantage to using filters is that you have good color throughout the image, including the blue water, which often looks washed out without them.

If you are using strobes, then it is important that you capture areas of the wreck that are identifying elements, and that they are small enough to be covered by the strobes. Popular elements are propellers, ladders, winches and rudders. The crow’s nest on the wreck of the Cedar Pride in Aqaba, Jordan is an interesting element and just the right size to light with strobes. The rest of the ship is much too large for the strobes to light.

The next image is of the steering quadrant on a ship called the SS Perseus which was sunk by the infamous vessel “The Wolf” during World War I. This element of the ship is important because it helped to identify the ship as being from the WWI era, and ultimately identify which ship it was, as only two vessels from that time period are known to have sunk here. Taking images of significant elements such as these is artistic because it illustrates the story.
Another tool that is always present in good underwater photography is a sense of depth. We often take images of a fish, with a reef behind them, and perhaps a diver in the background to give a sense of depth. On a wreck, it is important to give that same sense of depth. But if you are photographing something inside, that can be a challenge. A way to overcome this is to look for ways you can use ambient light in the background. In the image below, you can see a cargo hold filled with stacks of Italian tile. The ambient light in the background helps convey the vastness of the space.
Sometimes there is no possibility of bringing in ambient light, and you still want to convey a sense of depth. A tool you can use for this would be a remote strobe, or ‘off camera’ strobe. This is an additional strobe that is triggered remotely by the light from your strobes. You can place it wherever you want to create dimension to a closed space. This truck is in a closed portion of the cargo hold of the Thistlegorm in the Red Sea. There are several trucks in this space, so I put the remote strobe in the cab of the second truck giving depth to the area.
A remote strobe can also be used to light something in a room such as the boiler, or steering wheel, or some other interesting element. The image below shows a lot of dimension with the use of a remote strobe to light the back room, and blue water and fish in the background.
Light beams from the sun give moodiness to an image so if they are available, use them to create atmosphere. Beams of light can be difficult to capture, especially in a dark space. In this image I am using an ISO of 1250, f/5, 1/60. There is enough particulate in the water that the sunbeams are captured by it, even with a slow shutter speed.
Using different lighting techniques goes a long way when you are trying to transfer your underwater experience to your audience. Don’t be afraid to experiment with your strobes as well as ambient light, filters, remote strobes, and sunbeams. They are all tools that you can use to improve your underwater photography, and give value to your images.
Join me for a workshop! Travel to a great destination where you will have exclusive coaching on your underwater photography. Meet new people, network, try new techniques, and learn with the pros! Click on Travel and Workshops for more information!
Subscribe now!
As always, if you enjoy my images please visit my website, waterdogphotography.com, or give me a like on Facebook at Waterdog Photography Brook Peterson. Don’t forget to follow me here at waterdogphotographyblog and please feel free to share on Facebook or other social media.My photographs are taken with a Nikon D810 in Sea and Sea Housing using two YS-D1 or YS-D2 Strobes.All images and text is copyrighted by Brook Peterson and may only be used with written permission. Please do not copy or print them. To discuss terms for using these images, please contact me.
© 2016-2025 Brook Peterson

