There are many techniques for giving your underwater photography a creative edge. Sometimes just using a different lens can elevate your style. The underwater photography market has countless tools available that can add variety and interest to your portfolio. Many of these are good for just one technique. In other words, a one-trick pony. In this article, I will explore a few of the devices you can use to boost yourself into the saddle.

The Circular Fisheye Lens
A circular fisheye lens is a lens that has a 180 degree view in every direction, which creates a circle on the sensor. If you use a crop-sensor camera, you may need a 6.5mm lens, and for full frame, an 8mm. There are some 3.5mm circular fisheye lenses available for micro four-thirds cameras. The results can be stunning, but these lenses only do one thing, and that is circular images. Under water, these images can be very impressive. On land, the distortion from the fisheye shape can make the image wonky, albeit creative.


Although the circular fisheye lens only does one thing, some companies have created circular fisheye lenses that are more versatile. Both Canon and Nikon have a 8-15mm fisheye lens that can be used as a regular fisheye lens when zoomed to 15mm. This can be very helpful when faced with an expensive purchase just to take one type of photograph. It should be noted that to create a circular photograph, you must remove the shade/hood from your dome port and from the lens if there is one. Since the lens “sees” 180 degrees in every direction, the shade will interfere with the image. Some companies like Nauticam, make a removeable shade for their dome ports.

Ringflection
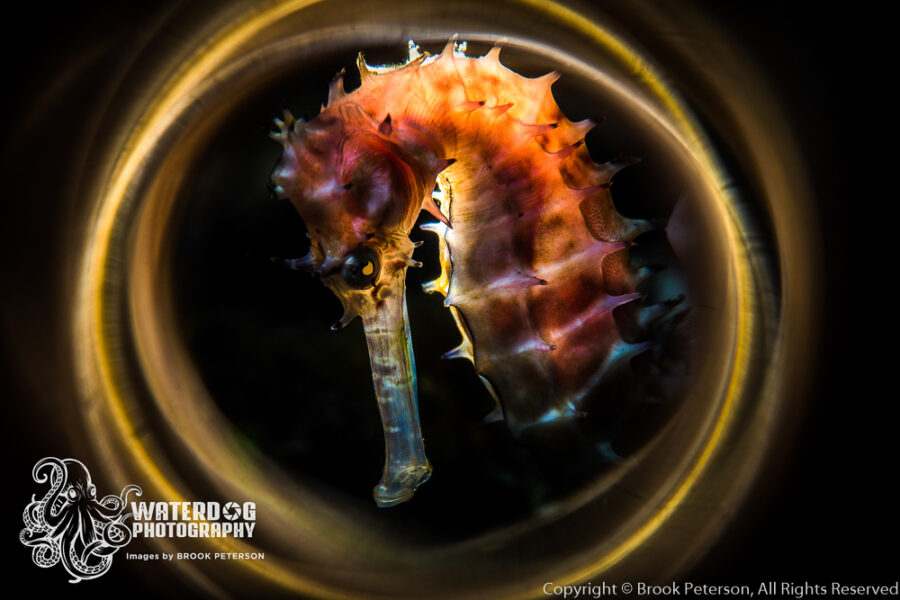
This technique is created by using a tricky little lens you can make yourself, or purchase. For the above image, I used a chrome downpipe which I had fitted to the end of my port. The subject is reflected inside the tube which frames it in it’s own colors. You can sharpen the “swirls” by using a high aperture, or soften them by opening the lens up. Saga makes a commercial version of this lens which they call a “magic” tube.
Any kind of reflective pipe can be used, although you should use different lengths for different length lenses. For example, the working distance for a 105mm lens is further than that of a 60mm lens, so the pipe will be longer to account for the working distance of a 105mm lens. You can find instructions and examples of homemade reflective pipes here.


Trioplan Lens
The Trioplan lens has been around since about 1952 when it was introduced by Meyer Optik Görlitz. It is well known for its beautiful soap bubble bokeh effects. Up until recently, the lens was out of production, but is now available for several major camera brands including Nikon and Canon. You can purchase it in a 50mm or 100mm length. I prefer the 50mm length to reduce my working distance. The lens must be focused manually and the aperture must be set manually. This can create a challenge in underwater photography because you must put the camera inside a housing.

Because the lens has a very small diameter, I had to work with it to get a focus gear to pair with my housing. The solution was to wrap electrical tape around the focus band on the lens many times until the tape was thick enough to fit a focus gear onto the lens.
Preset your aperture for 2.8 to achieve the most bokeh. Set your shutter speed as high as it will go and still sync with your strobes. If you have the option of High Speed Sync, use it so that there is not too much light entering the lens. You will have to focus manually. The resulting images can be interesting and can isolate the subject beautifully.


Magic Ball Lens
The Magic Ball lens is made by Saga and it is a wet lens that you can put on a 67mm flip adaptor on your housing. Alternatively, you can screw it on to most macro lens ports that have a 67mm thread. The lens has a sphere inside that is centered in the glass so that you get a spherical image. In the background, you will have the same subject. The image inside the sphere will be upside down, so you must flip the image in post to have it oriented correctly. The image above was shot with a 60mm lens behind the Magic Ball. It can also be used with a diopter.

Colored Lights and Gels
Many companies have come up with different ways to add colored light to a macro image. You can find torches that have colored filters such as the Kraken Multicolor Filter & Snoot, or the Backscatter Color Filter System to name a few. These are underwater lights that use a colored gel over the lens so that the light comes out colored. They can be a challenge to use as it may not be appealing to have the color on your subject. To avoid this, the light should be used as a background color, and a snoot can be used to overpower the colored light on your subject.
The above photo was taken using a snoot on the yellow goby and a red light in the background. The camera settings are adjusted so that the colored torch light can be picked up by the camera’s sensor, and the snoot is turned down to its lowest setting.

Sometimes it is appealing to have the light on your subject, such as this white eyed moray eel. Because the eel is inherently creepy, the blue and green lights add to the mood. Alternatively, you could use the colored light as a backlight to just add some color to the rim of your subject, using a snoot or fill flash to light up the front of the subject. The image below was shot using this technique.

These are only a few examples of some things you can do to pump up your portfolio. Because they are only good for one technique, it would not be prudent to have a lot of images showcasing just one of them. But a smattering of “One-Trick-Ponies” in your portfolio can show versatility and creativity as long as you have other solid images to complement them.
Author’s note: Our underwater photo workshop in Anilao, Philippines focuses on a variety of techniques including those shown here. Participants are encouraged to learn how to use them and the tools are available to borrow. If you are interested in joining us for photo coaching at Crystal Blue Resort in Anilao, please visit www.waterdogphotographyblog.com/travel-and-workshops .
Subscribe now!
As always, if you enjoy my images please visit my website, waterdogphotography.com, or give me a like on Facebook at Waterdog Photography Brook Peterson. Don’t forget to follow me here at waterdogphotographyblog and please feel free to share on Facebook or other social media.
My photographs are taken with a Nikon D850 in Sea and Sea Housing using two Retra Pro Strobes.
All images and content are copyright protected by Brook Peterson and may only be used with written permission. Please do not copy or print them. To discuss terms for using these images, please contact me.
© Brook Peterson 2022


