When I first started photographing the world underwater, I hoped to capture my dive buddy interacting with the environment. But every time I pointed the camera in his direction, he would wave, give me a “thumbs up,” or take out his regulator and smile. I soon realized that he had no idea what I wanted from him and I began to communicate to him, before we entered the water, how I wanted him to behave for the camera. It didn’t happen overnight, but with some practice, my better half became a fabulous dive model.

Accomplished underwater photographers have a diverse portfolio, often including images that depict a diver either as the main subject or secondary subject. Getting a good shot with a dive model doesn’t have to be expensive or complicated. It can be accomplished with a good dive buddy just by communicating your intentions ahead of time. After a dive trip I gently told my dive buddy that I loved taking pictures with him in the picture, and I wanted to start using him in some of my more “serious” shots. This would prove to be an exercise in patience as both of us had to discover what worked and what didn’t. The following guidelines are some of the “rules” we use for divers as a secondary subject.
Look at the Subject
In order for your audience to be engaged with the subject in your images, your model needs to be engaged. It is important for the model to look at the subject. If the model’s face is very close to the subject, then have him focus a bit past the animal so that his eyes do not appear crossed.

Keep your Feet/Fins Together
Not every picture has to have the fins together, but a diver strikes a much better pose when the legs are in line with each other. I often ask my buddy to place one foot on top of the other so that only one fin appears.

Face The Camera
There is a certain pose that I prefer where the model is facing the camera at an angle of about 45 degrees, so that it looks like he is swimming into the picture. I especially like this pose for close focus wide angle shots, and for shots where the diver is entering a small space such as this cave.

Tuck your Elbows In
It is distracting when the diver in your image appears to have problems with trim and/or buoyancy, so I always make sure that the elbows are tucked in tight against the body, and that nothing is hanging down such as an SPG. If she is carrying a camera, I either have her put it down, or make sure it is as compact as possible, unless it is part of the image. i.e: a diver taking a picture.

Point the Dive Light
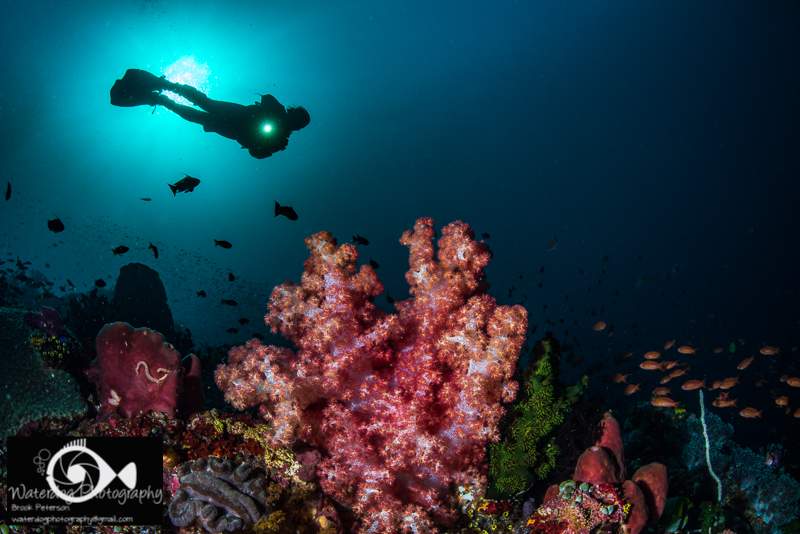
If your dive model has a light you can have him point it at the main subject, or point the light towards your camera lens. He should hold the light so that it is centered on his body about midway up the torso. If the light is attached to a camera housing, hold the camera close to the body.

For some images, it works better if the model appears to be using his light to explore. In this case, you will want to capture the light beam. Your camera should be mostly perpendicular to the beam of light and the less strobe light coming from you, the more the beam will shine.

Breathe Normally
One of the problems with using a dive model is that you have to breathe at the same time so that your exhale and the model’s exhale don’t appear in the image. I always ask my model to breathe normally and I will coordinate my breath with theirs. It is easier than trying to anticipate how long they will hold their breath for a shot.

Just a few other tips to keep in mind are to make sure your strobes are lighting the model’s face as well as the subject. The model’s eyes should be turned toward the subject, but his face should be turned toward the camera. The model is secondary, but his face is just as important to light as the subject. Attractive models are good for close up work, but most people look good under water when they are dressed in neoprene, so don’t worry too much about attractiveness. If it is a problem for you, shoot in silhouette.
Silhouettes
When using a model as a silhouette in the background, keep in mind the distance the model is from the camera, and the pose you want. Although I prefer the horizontal pose most of the time, there are times when a vertical pose works better. When the diver is in the distance for example, their silhouette may look better in a vertical position. The image below had a cathedral type arch and the image looked better with the diver in vertical pose.

In this image, the diver was carrying a large camera rig. He turned it upside down so that the strobe arms were hidden in his silhouette and the light sitting on top of the housing was now in the middle of his body. It was an effective trick to make him appear to be holding only a torch.
It is important to create hand signals before you get in the water so that your buddy understands how you want him to pose. I have also found it useful to use the dome port as a mirror. When I am posing for someone, I can usually see my reflection in their dome port along with the subject and I am able to position myself so that they can get the best shot.

These tips and tricks are suggestions that I have found helpful over the years. My dive buddy has become an excellent model, and as a result my shots have improved dramatically. Remember to be kind to your buddy when suggesting ways for him or her to improve and be flexible when underwater as communication is limited.
Join me for a workshop! Travel to a great destination where you will have exclusive coaching on your underwater photography. Meet new people, network, try new techniques, and learn with the pros! Click on Travel and Workshops for more information!


