Backscatter. Everyone worries about backscatter. But truly, there is one rule that you can use to avoid most backscatter issues and that is to be sure your strobes are back behind your dome port. The rule of thumb for me is that the heads of my strobes are no further forward than the handles on my housing.

There are many ideas out there on how to further avoid backscatter. Since backscatter is caused by particles in the water reflecting the light from your strobes back into your lens, many people will turn their strobes slightly out or in, so that the angle of reflection bounces away from your camera lens. You can try this too as it may be a solution for you, especially if you dive in lower visibility conditions. However, I have had the exact same results with my strobes facing straight forward, so I prefer not to worry so much about the direction the light is going to bounce. Instead, I will put more effort into how high the power is on my strobes. Often, just turning the power down a bit on one or both strobes will reduce backscatter.
Strobe position is another hot topic and there are a lot of ideas out there. How close should the strobes be to your housing? How high or how low? What if you want to make a vertical image? What about close focus wide angle? What about big animals? Each circumstance merits consideration as the position of your strobes may require a change for each one. The basic position that I use for a good majority of my work is to have the strobes about 8-12 inches away from the housing, facing straight forward, with the strobes at nine and three o’clock.

Variations of this are fine, but generally speaking this is the position I will use when I am just swimming around looking for my next subject. Then, if something like a sea lion approaches suddenly, I am ready to shoot.
Tip: A good rule of thumb for how close the strobes should be to your housing is to place them about as far apart as you are from your subject. In other words, the strobes in the picture above are about 18-24 inches apart. Using this rule, I should be about 18-24 inches from my subject to get proper lighting.
The height of the strobes depends on how large a subject you want to light. If you are trying to light an entire reef, you might consider putting your strobes up above your housing so that the light can be cast evenly over a large area. You can adjust the distance that the strobes are from each other according to how wide an area you want to light. Keep in mind, however, that the light comes out from the strobes in a cone shape, and you want that cone of light to cross in the middle so that there is not a dark area in the middle of your image.

Vertical images can be a challenge and there are a couple of different ways you can light them up. When you turn your housing so that it is vertical, you will have one strobe on the top at twelve o’clock, and one on the bottom at six o’clock. This is just fine if you are shooting a large scene, or you are a few feet from your subject. It becomes a problem when you are close to your subject, or you want to shoot something where one of the strobes (usually the one on the bottom) is too close to the subject. This may result in part of the image being blown out.
Tip: The solution to this is to turn the bottom strobe down (quite a bit) until the light on the top matches the light on the bottom.

Improperly lit with too much light from the strobe on the bottom

Properly lit image with bottom strobe power set to 1/4 power and top strobe set to 3/4 power.
Another strobe position for vertical images is to move the strobes so that they are positioned at nine and three o’clock when the housing is turned into a vertical position. This takes a bit of effort, but the reward is a properly lit image without having to adjust the power of your strobes as much.
Close focus wide angle photography is when you have a relatively small subject in the foreground along with something in the background such as a diver or the sun. In these images it is important to light them so that the subject, surrounding area and the background light blend together. You want the viewer to see the image as one beautiful picture, instead of noticing that you have used artificial light on part of it.

For example, the gorgonian fan in the image above was only a few inches from my dome port. It and the reef around it looks like there is no artificial light and the ambient light in the surrounding kelp forest blends with the light from my strobe. It appears that the light comes from above all from the same light source. That should be your goal in any close focus wide angle image. I achieved this by putting my strobes a little above my housing which was in vertical position, at about ten and two o’clock. The strobe on the right is set at a slightly higher power than the one on the left because the reef was a bit further away on that side.
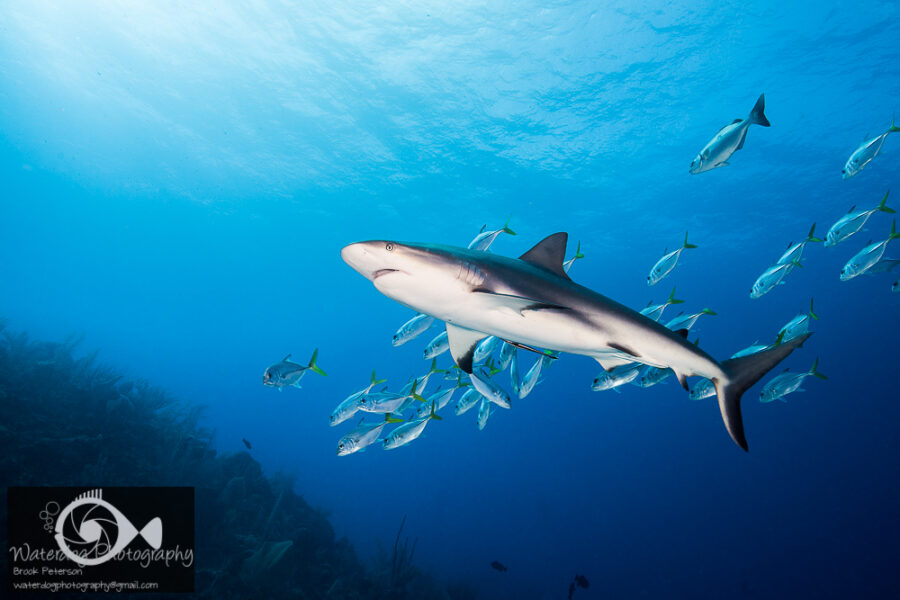
Lastly, big animals can be a challenge to light properly for several reasons. In most cases, I expect to be from two to three feet away from a large subject such as a shark. In this case, I will pull my strobes apart to about two feet and turn the power up to one stop under full power. I will also meter for the ambient light at the depth I am shooting at. A good guess for settings in clear blue water is f/8 and 1/125th with ISO at around 400. This can vary greatly, but it is a good place to start.

This turtle was very close to my strobes and is entirely lit by them, while camera settings are adjusted for the bright sunlight at f/16, 1/320th and ISO 200.

This shark is also entirely lit by my strobes and I am about two or three feet away from it in this image. The strobes are two feet apart, facing straight forward and set on the highest power. My camera settings are exposed for the ambient light at f/9, 1/200s, and ISO 320. Had there been no strobe light on the shark, it would appear as dim and dark as the reef in the left corner.
Photographers spend their entire careers mastering light in their images. Utilizing a few tips such as these can help you on your way to conquering light in a way that will make your images stand out from the crowd. Don’t be afraid to experiment, and change up the rules. Sometimes we get hung up on how to accomplish a task, rather than experimenting with our equipment. The main goal is to make your images look like they are naturally and evenly lit. Remember this and you cannot fail.
For tips on using light creatively for macro photography, please visit my tutorial “Let There Be Light!”
For more lighting tips on getting better images in low visibility and avoiding backscatter, visit “Five Life Hacks for Better Wide Angle Photography”
Join me for a workshop! Travel to a great destination where you will have exclusive coaching on your underwater photography. Meet new people, network, try new techniques, and learn with the pros! Click on Travel and Workshops for more information!


